A Dreamy Craft Room
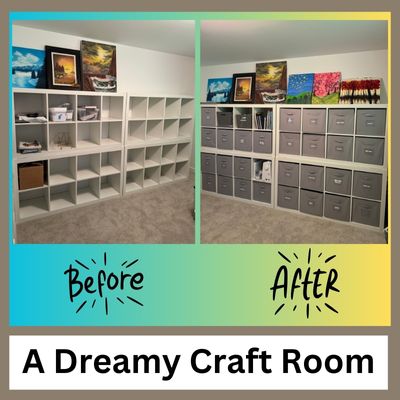
Have you always wanted a nice roomy art room to do all your fun creative projects?? My client had! This has been such a fun project to work on. Since there were multiple home projects that had to get finished to create this room, we had to work on it in stages. I was so excited to see it finally come together! In this post I’ll share all that went in to making this room.
Sorting and Purging
The two major home projects that had to get completed before making this room into an art room were installing new carpet and getting custom closets installed. But since my client doesn’t have a basement or much space for storage, this room and another room had been used for storage. So prior to getting the new carpet and custom closets, we got to sort through decades worth of memorabilia and other fun stuff that my client had inherited or acquired over the years. Some of the stuff we went through was from family members who had passed away, so I had fun finding some old coins and bills from their coin collection! I also loved checking out the vintage toys that we uncovered. As some people know, I love collecting Breyer horses. I was happy to see that my client had a few that she had saved from when she was a kid. My client is a voracious reader, so we had lots of books to sort through. Paper was another big category! We spent lots of time going through old paperwork and either shredding it, recycling it, or storing it. We sorted through almost everything in the house!
Creating Storage
Once the bulk of the items in storage had been sorted and donated, my client was ready to get her new carpet and custom closets installed. This step helped us take a good leap forward with the organizing project because we then had shelves in the closets to stage what would be stored where. Here are some of the things we grouped together and made designated spaces for:
- Gifts! This is always one of my favorite things to help people organize. Like many people, my client likes to collect gifts for people throughout the year. But due to no fault of her own, sometimes the gifts got lost because the hiding spaces she had picked out were just too good. So we collected all the gifts together and sorted them by person. Or generic gifts were sorted by either kids or adults.
- Linens: When you have a house without a linen closet, it makes it really hard to keep all your linens together! We gathered the linens she wanted to keep and found space for them in the new closet.
- Games: We collected all the games together and transformed a small closet (that may have been originally designed for linens, but was too small) to be the game closet. It’s in a convenient place to quickly find a fun game to play with guests.
- Office supplies: The home office had been used for storing some large items for other family members, so it was hard to access what she needed. Once she got those items either sold or rehomed to other areas in the home, we had space to corral all the office supplies. She already had drawers that were perfect for office supplies, so we were able to integrate the supplies we found into the setup she had already created for herself.
- China/holiday China: Another fun thing we found along the way was China and holiday China. We sorted it and stored the holiday China together, so it could be used and enjoyed at the right time of year.
- Books: Since my client loves to read, she had collected a lot of books over the years. We donated about half of them. We stored similar types of books together, but they may still need another culling before they get put on shelves.
- Photos: This project is still in progress, but we grouped all the photos into one area of the closet. Having them all in one place will make sorting through them in the future so much easier.
- Memorabilia: It’s always so much fun to sort through old memorabilia to see what you really have, and what’s still meaningful to you. We were able to group the stuff she wanted to keep by type, and the precious memories got safely stored in another area of the home that we had cleared out.
- And of course… art supplies! As we were sorting through items throughout the house, we would always group the art supplies together such as sewing stuff, paint supplies, paper, and drawing. But the really fun stuff (Christmas crafts) that she had acquired over the years had all been neatly stored in another area of the home. So once she had the art room ready, we knew exactly where it would go!
Designing the Art Room and Setting Up Furniture
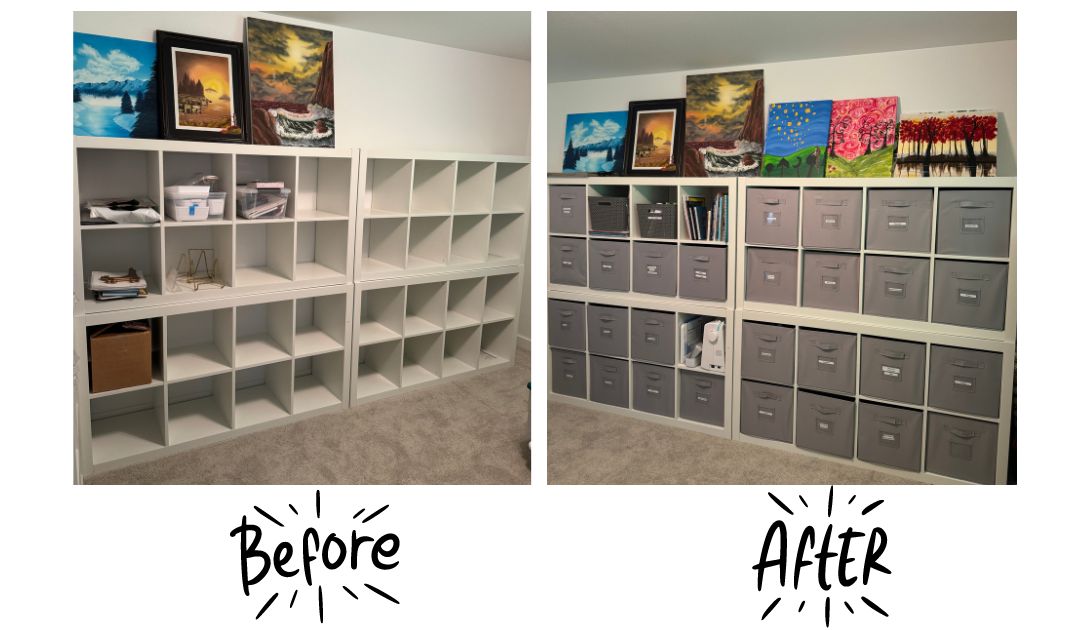
We had talked about what kind of furniture might be good for the room, but my client was the one that picked out what she wanted and got it all assembled on her own. What she picked out is working out perfectly! She got plenty of small containers and extra plastic woven bins that could fit within the grey fabric cubes in case she needed them for layering or containing smaller items.
Once we got the shelves in place, we kind of roughed out what we wanted in each cube, and then containerized everything. I used my trusty blue painter’s tape and a Sharpie to make temporary labels (in case we needed to reorganize or consolidate). My client’s college age daughter was home for the summer, so she was available to use my label maker to make the labels.
What’s Left To Do
The room still has a little more work that needs to be done. She still needs to get a table so she has a place to actually do the fun stuff! I know she also wants to hang the paintings on the wall to act as inspiration and decoration. And since the room is carpeted, when she’s working with messy materials such as paint or glitter (my favorite!), she’ll need to put something down to protect the floor. She also needs to add a work light to the table so she can see what’s she’s working on. There’s still plenty of space to store new materials and finished work. (There’s a whole set of empty shelves that didn’t make it into the photo). But what we got done was a major accomplishment, so I wanted to celebrate it with a before/after post for her!

Posted By Jean Prominski, Certified Professional Organizer
- Follow me on Instagram @seattlesparkle
- Join my Facebook Group, Declutter and Organize with Seattle Sparkle.
- Ready to book a consultation? Complete this form.


